Homeowners Guide to Metal Roof Installation (Step-By-Step Guide)
Metal roofing has a long and reliable history that spans centuries. In ancient Rome, copper was used to roof important structures like the Pantheon because of its strength and resistance to the elements. By the 1700s and 1800s, metal roofing became popular across Europe and North America, especially for government buildings, factories, and agricultural structures. Corrugated iron and tin roofs were widely used for their durability and lightweight design.
In the United States, metal roofing became more common in the 19th century, particularly in rural areas where farmers needed strong, long-lasting materials for barns and sheds. As technology advanced, new materials like galvanized steel and aluminum made metal roofing even more practical for residential use.
Today, metal roofs are known for their exceptional lifespan, energy efficiency, and minimal maintenance needs. Whether you're installing a new roof yourself or hiring a contractor, understanding the process is essential. This guide breaks down each step of metal roof installation so you can plan effectively, avoid common mistakes, and get the most out of your investment.
What Tools are Required to Install a Metal Roof?
- Tape measure
- Chalk line
- Utility knife
- Tin snips / aviation snips
- Power drill or screw gun
- Metal-cutting circular saw or shears
- Rivet gun
- Caulk gun
- Hand seamer (for standing seam systems)
- Level
- Ladder and roof jacks
- Fall protection gear (harness, anchors)
- Magnetic nail/metal sweeper
- Safety glasses and work gloves
What Materials Are Required To Install A Metal Roof?
- Metal panels (standing seam, corrugated, or metal shingles)
- Synthetic underlayment
- Ice & water shield (for valleys and eaves)
- Roofing screws (with rubber washers)
- Butyl tape or sealant tape
- Flashing
- Ridge cap
- Valley flashing
- Endwall/sidewall flashing
- Gable and drip edge
- Foam closure strips (upper and lower)
- Pipe boots (for vent and pipe penetrations)
- Roof sealant / metal roofing caulk
What are the steps to installing a metal roof?
Follow these steps to ensure a proper, long-lasting metal roof installation:
1. Inspect and Prepare the Roof Deck
- Check for damage or soft spots in the plywood or OSB sheathing.
- Remove existing shingles or roofing material unless you're approved for a roof-over installation.
- Replace any rotten wood, loose nails, or warped decking.
- Ensure the surface is clean, dry, and flush to prevent future issues with panel alignment.
2. Install Synthetic Underlayment
- Roll out synthetic underlayment horizontally, starting from the eaves.
- Overlap each course by 4–6 inches and fasten with plastic cap nails.
- Make sure there are no wrinkles or gaps to avoid water pooling beneath the panels.
- In cold or ice-prone regions, apply ice and water shield along valleys, roof edges, and penetrations using a product rated for metal roof compatibility, such as ice and water barrier.
3. Install Drip Edge and Perimeter Flashing
- Fasten drip edge flashing along eaves and rake edges with metal roofing screws.
- Apply butyl tape underneath the drip edge for added waterproofing.
- Make sure the flashing is snug and level to avoid issues when the panels are installed.
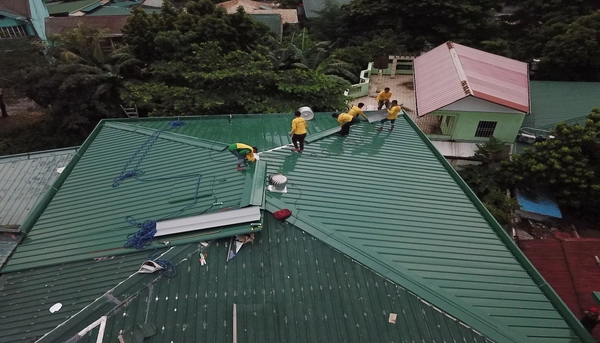
4. Lay Out and Install Metal Roofing Panels
- Begin installation at the lower-left corner of the roof.
- Position the first panel square to both the eave and ridge.
- Secure using roofing screws with rubber washers in either the flat or rib section (per manufacturer spec).
- Drive screws perpendicular to the panel not at an angle to ensure a watertight seal.
- Overlap panels and seal with butyl tape at joints to prevent water intrusion. Refer to Englert’s full range of metal roofing panels including A1301, A1100, and S2500 for matching your project needs.
5. Trim Panels Where Necessary
- Use aviation snips, metal shears, or a metal-cutting circular saw to cut panels cleanly.
- Account for obstructions like plumbing vents, chimneys, or dormers.
- Install foam closure strips beneath cut panels and ridge lines to block insects and moisture.
- Ensure panel ends are sealed and supported to prevent rattling and uplift.
6. Install Flashing and Roof Penetrations
- Add valley flashing before laying metal panels into valleys.
- Fit endwall and sidewall flashing tightly around dormers, skylights, and vertical wall intersections.
- Overlap flashing sections correctly and apply sealant under all overlaps.
- Pipe boots should be fitted over vents and sealed thoroughly using metal roof-compatible sealants and flashing techniques that prevent water infiltration and accommodate thermal movement.
Is it hard to install a metal roof by yourself?
Yes, installing a metal roof by yourself can be difficult and is generally not recommended unless you have prior roofing experience. Metal roofing requires precise measurements, correct panel alignment, and expert flashing installation; any missteps can lead to leaks, structural problems, or costly repairs.
The tools involved, such as seamers, metal shears, and screw guns, are specialized and not commonly found in a typical homeowner’s toolkit. Safety is also a major concern, as handling large, sharp panels at heights can be dangerous without proper fall protection and equipment.
Most metal roofing warranties require professional installation and may be voided if the roof is DIY-installed, especially in cases where underlayment, fasteners, or flashing were improperly installed.
Metal Roof Maintenance Checklist
To keep your roof in optimal shape and protect your investment, follow this seasonal maintenance checklist:
- Inspect sealant lines and exposed fasteners annually, reapplying high-grade sealant where degradation is visible.
- Inspect roof twice a year (spring and fall) for loose fasteners, shifted panels, dents, and worn sealant.
- Check the roof after major storms for damage or debris.
- Clear gutters, valleys, and roof surface of leaves, branches, and buildup.
- Wash panels gently with soap and water to remove dirt, mildew, or stains.
- Trim overhanging tree branches to prevent damage or abrasion.
- Check snow guards (if applicable) before winter and after snowstorms.
- Look for signs of rust or corrosion, especially around edges and fasteners.
- Watch for oil canning (wavy distortions on flat panels), especially on thin gauge panels.
- Confirm gutters and downspouts are clear and draining properly.
- Address minor scratches or coating damage with approved touch-up products.
How long does it take to install a metal roof?
The time it takes to install a metal roof varies based on the roof’s size, design complexity, and weather conditions. For an average residential home, a professional crew typically completes the job in about two to five days.
Can I install a metal roof over my existing shingles?
Yes, it’s often possible to install a metal roof over a single layer of asphalt shingles, provided the roof deck is in good condition and meets local building codes. This method can save time and money, but always consult a roofing professional to confirm whether it’s a suitable option for your specific home.
What’s the cost of installing a metal roof?
The upfront cost of metal roofing is higher than asphalt shingles, but its long-term value is greater due to its durability, energy savings, and lower maintenance. For accurate pricing, it’s best to request a quote from a certified metal roofing contractor who can assess your project needs.
What should you put down before putting on a metal roof?
Before installing metal panels, a synthetic roofing underlayment should be laid over the roof deck. In colder climates or areas prone to ice dams, ice and water shields may also be required at the eaves and valleys to prevent moisture intrusion.
What is the best thing to put under metal roofing?
The most recommended underlayment is a high-performance synthetic material because it’s more durable and weather-resistant than traditional felt. In regions with frequent freezing or heavy rain, additional ice and water barriers are also advised for extra protection.
Is a metal roof harder to install than shingles?
Yes, metal roofs are generally more complex to install. They require precise measurements, specialized tools, and professional experience to ensure proper sealing, fastening, and thermal movement handling. This is why professional installation is usually preferred.
What’s the biggest mistake to avoid during metal roof installation?
The most common errors include misaligned panels, improperly driven screws, and failing to seal flashing and overlaps correctly. These mistakes can lead to water leaks and reduced performance over time. Following manufacturer instructions closely and hiring a skilled installer helps prevent these issues.